Troubleshooting Fit in 1780s Stays

Tags

, , , , ,

18th Century stays are a weird animal to wrangle. They’re rather rigid and a totally different shape than we’re used to seeing in a natural body. In my previous post, I elaborated on the nuances of 1780s stays and how they’re different from their earlier and later counterparts…. but how are they supposed to fit on MY body?

Below I hope to help y’all out by showing you some graphics (bear with me, I have only recently started using a vector program!) to illustrate what to aim for and how to fix fit issues with any 1780s pair of stays you’re trying to make.

**The images and fit comments made in this post are in no way meant to criticize natural body figures or shame those that do not fit the ideal 18th century shape. These images are simply made to address specific fit issues using a basic template image to make the drawing process faster to produce**

Comfortable Fit

COMFORTABLE FIT: Ultimately a pair of 1780s stays should be snug throughout, control the bosom by holding in the breasts just above the nipple thus creating a gentle mound above the top edge of the stays. They should crest mid-shoulder blades at the back and create a smooth, conical shape to the body. The highest cut of the tabs should reside comfortably just below the smallest part of the waist and should curve gently downward. A thrusted (or prow) center front is desired, but usually only achievable with a bust measure much larger than the waist- the body can be padded out to create this silhouette if desired.

LENGTH:

Length issues seem to the be the #1 problem most have with fitting a pair of stays. Too long and the stays dig into sensitive parts of the body or too short and bits of your body fall out. It’s very tricky stuff.

Too High Image

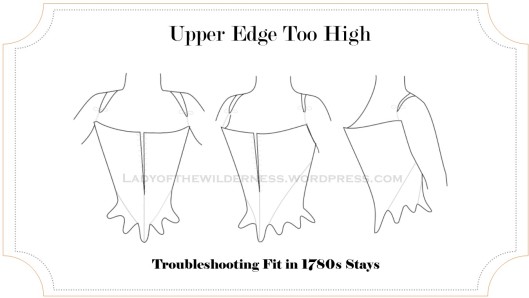
TOO HIGH ALONG UPPER EDGE: This image demonstrates what the top of the stays look like if they are too high. The tied points of the stays throughout the armscye dig into the arm and armpit. This can cause the bust to sink (have no support) OR to be too compressed and bring the bust too your chin. Issues that can result from this are chaffing/bruising in the arms from the upper edge, and chaffing at the bust too to excessive movement. This is not only uncomfortable but impractical for any sort of movement you may plan to make.

HOW TO FIX IT: If the stays are less than 1/2″ too high for your liking, shave the upper edge down to your desired height. If the stays are more than 1/2″ too high, the stay pattern should be shortened to the desired length. **Please note: Shortening the entire pattern piece is necessary for more than 1/2″ of difference because an inverted cone shape tends to have dramatic measurement differences as your lines go toward the floor- resulting in the bust measurement to be too small when the upper edge is merely shaved down.**

Top Too Short

TOO SHORT ALONG UPPER EDGE: This image demonstrates what the top of the stays look like if they are too short. There is typically not enough bust support with this issue, so the bust tends to spill out and create extreme “muffin top-esque” shapes. Issues that can result from this are discomfort and/or chaffing in the breasts, pinching pain in the upper ribs and a visible top line of bust spillage that makes pinning your garment into the stays less feasible at the top edge.

HOW TO FIX IT: If the stays are less than 1/2″ too short for your liking, raise the upper edge to your desired height. If the stays are more than 1/2″ too short, the stay pattern should be lengthened to the desired length. **Please note: Just as with the above issue of shortening, it is necessary to lengthen the entire pattern piece for more than 1/2″ of difference because an inverted cone shape’s dramatic differences in measurements as you travel up and down the pattern. Simply redrawing the top edge could result in a bust measure that is too small or too large.**

Waist Too Long

TOO LONG AT WAIST: This image demonstrates what the waistline looks like if it is too long into the body. Hallmarks for this issue are a dramatic (almost 90 degree) curve in the waistline, resulting in very flippy tabs. Issues that can arise from this are cutting off circulation to the lower part of the body or causing kidney/lower back pain, pain in the pubic bone when sitting down, and broken boning if using reed or cane. It is not advisable to have this type of shape to your stays if you plan on moving a lot.  **Other Fit Possibilities: This shape can also arise when the subject’s hip bone structure is very high and/or squared. If this is the case, tweaking the pattern slightly may be the only option, as the silhouette will largely remain the same due to bone structure.**

HOW TO FIX IT: If the stays are less than 1/2″ too long for your liking (or possibly too small at the waist) cutting the tabs slightly inward toward the waistline can help with this issue. If the stays are more than 1/2″ too long, the stay pattern should be shortened to the desired length. **Cutting tabs can result in the waistline of pattern enlarging slightly**

Waist Too Short

TOO SHORT AT WAIST: This image demonstrates what the waistline looks like if it is too high on the body. Hallmarks of this issue are a pain in the lowest part of the ribs and the center front tab to protrude more than 25degrees forward. Issues that can arise from this are pinching pain in the lower ribs and diaphragm as well as pain in the gut from being squished downward. This also results in an odd pointed tab that pokes forward at the center front of your petticoats.  **Other Fit Possibilities: This shape can also arise when the subject has more mass in the front lower part of the abdomen. If this is the case, a wider wooden busk can alleviate the front protrusion but this may be the subject’s natural shape in the stays.**

HOW TO FIX IT: The stay pattern should be lengthened to the desired length according to your mockup and graded accordingly.

Also note: This higher style of waistline IS FASHIONABLE and correct for later 1780s-1790s and transitional stays.

BUST:

Fixing fit for the bust is an extremely hard task since bust tissue can vary in weight and density, have dramatic differences in sizes between sides and is generally an unstructured mass. Since it can be moulded and influenced into shape, having a mockup as a starting point makes fitting the bust far easier to pinpoint.

Bust Too Small

TOO SMALL AT BUST: This image demonstrates what the bustline looks like if the front pattern piece is too narrow. The bust is not completely contained and can be lifted uncomfortably high, and the tied points of the upper edge do not hold the sides of the bust in the stays. Issues that can arise from this problem are trouble breathing, pinching at the top of the ribs and chaffing on the skin along the upper edge.

HOW TO FIX IT: The front pattern pieces should be widened to desired width between tied points or graded up to the next pattern size for the upper edge. Sometimes widening the front pattern piece a small amount at center front can help if it is a small (less than 1/2″) amount of width. Using the measurement across the chest from armpit to armpit is a good starting place to fix this issue.

Bust Too Wide

TOO WIDE AT BUST: This image demonstrates what the bustline looks like if the front pattern piece is too wide. The bust tends to sink into the stays- thus not being adequately supported- and the tied points of the upper edge dig into the arms and/or armpits. Issues that can arise from this are the stays causing rashes or blisters from excessive rubbing and the inability to sit in a comfortable posture.

HOW TO FIX IT: The front pattern pieces should be reduced to the desired width between tied points or graded down to the next pattern size for the upper edge. For reductions less than 1/2″, subtracting gently from the center front line to the mid point of center front may help. Using the measurement across the chest from armpit to armpit is a good starting place to fix this issue as well.

Uneven Bust

UNEVEN BUST: This image demonstrates what the bustline of the stays look like if the bust tissue is uneven. Issues that can arise from this are pain in the breast tissue and being generally unsupported and/or squished.

HOW TO FIX IT: Fit the majority of the issues to the larger side of the bust as indicated with the above troubleshoot fixes. For the smaller side of the bust, a bust support- or “cookie” as it’s called in the costuming world- can be made to supplement the lesser bust tissue and tacked into the stays once they are finished. Various shapes can be made depending on your needs: For less full tissue try a crescent shape for support. For less-existent tissue try a half circle made with knit fabric to fill out the area.

WAISTLINE:

The waistline… ahhh… the part we’re all vain for. 18th century stays don’t generally make for a great tightlacing situation- as the conical shape and flare of the waist can be very dramatic if laced improperly and cause a host of issues for the abdomen. For the most part, 1-3″ of reduction is the norm, though some who are more squishable can achieve more of a reduction. Since the dawning of tightening garments, there have been oodles of satirical images and such regarding their “dangers” and the silliness of those who vainly want to achieve the smallest waist measure. Those sentiments should be taken with a grain of salt. 18th century stays were a practical garment for bust and back support and of course can be used for altering the body shape if desired- but for the most part people go with… and went with… what’s comfortable.

WAISTLINE ANGLES: These images demonstrate the differences in angles that can be achieved with stays. Some of them are dependent on bone and body structure, but for the most part, we try to aim at Image B where the angle of the waistline tabs are between 20-30 degrees upward toward the back.

Side Angles

WAISTLINE PARALLEL TO GROUND: Image A demonstrates a waistline that is parallel to the ground. This can result in the posture being thrown backward and the front lower abdomen/hips to angle uncomfortable downward. Issues that can result from this are a sore lower back, kidney pain, pain in the shoulders and spine and/or pain in the abdomen. **Other Fit Possibilities: For those with more mass in their lower abdomen or who have low glutes, this shape might be perfectly normal and needed for their body shape**

HOW TO FIX IT: First, tighten or add adequate straps. I have noticed that many people who do not have straps added to their mockups bring this issue to my attention and it is quickly resolved once the straps adjust the overall angle of the stays. If straps do not fix the issue then try either snipping the tabs more inward at the waistline as you make your way toward the back OR gradually shortening your pattern pieces toward the back.

WAISTLINE SEVERELY ANGLED: Image C demonstrates a waistline that has an extreme (more than 35degree) angle upward toward the back. This can result in the posture being thrown far forward- similar to an S-bend corset- and the abdomen/hips to angle upward and outward. Issues that can result from this are a sore lower back, pinched rib pain in back, pain in the shoulders and spine and/or pain in the pubic bone when attempting to sit. **Other Fit Possibilities: For those who have high glutes or a more severe curve in their lower lumbar this shape is perfectly normal and needed for their body shape**

HOW TO FIX IT: Loosen the straps or shorten the pattern pieces gradually toward the front as needed.

BACKS:

The following images will address fit issues by looking at the backs of the stays. 18th century stays are intended- and amazing- for back support, so addressing where the backlines should be is important for a comfortable fit. The goal is parallel, vertical lacing and back pieces that rise to the midpoint of the shoulder blade.

Back Too Wide

BACK PIECES TOO WIDE: This image demonstrates a back piece that is too wide for the body. The back of the armscyes dig into the arms/armpits and the top back of the stays can close very easily. Issues that can arise from this are chaffing/blistering of the arms and armpits as well as straps that fall off the shoulders easily.

HOW TO FIX IT: Decrease the width of Center Back Panel at the top edge as needed and grade down to the proper waist measurement. If the decrease results in taking away a piece of boning, split the difference between Center Back and Side Back panels so as not to compromise the structure of the stays. If the back issue is too wide at the armscye edge, shave away along the armscye the desired amount until a level of comfort is reached.

Back Too Narrow

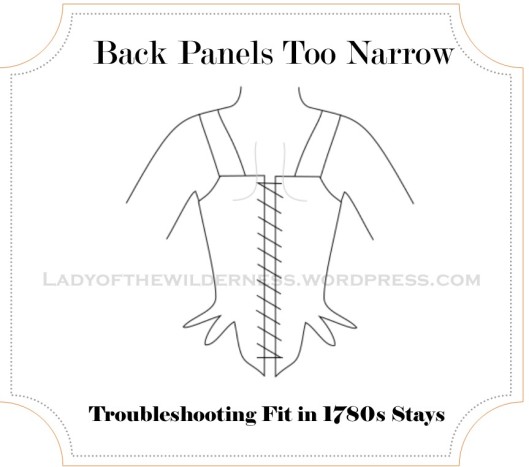
BACK PIECES TOO NARROW: This image demonstrates a back piece that is too narrow for the body. The back of the armscyes dig into the back, can create spillage of back tissue and pull the arms back into an extremely proud posture. Issues that can arise from this are chaffing/blistering of the back tissue as well as sore shoulders and spine.

HOW TO FIX IT: Increase the width of Center Back Panel at the top edge as needed and grade down to the proper waist measurement. If the increase is more than 1/2″, split the additions between Center Back and Side Back panels so as not to compromise the overall angles of pattern pieces and grade to waist. If the back issue is too narrow and cuts into the back at the armscye edge add more area along the armscye to the desired amount until a level of comfort is reached.

Back Too High

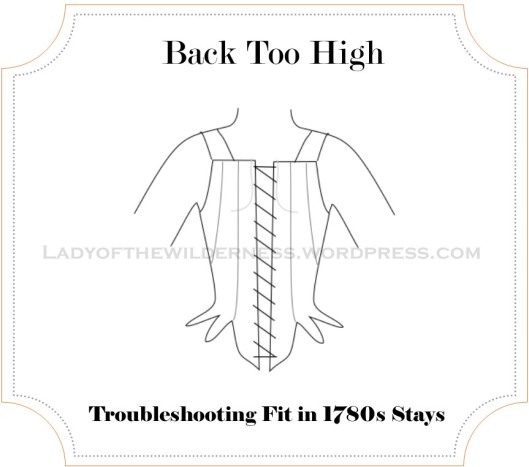
BACK PIECES TOO HIGH: This image demonstrates a back piece that is too high for the body. The top line of the back piece sticks out, creating a severe line visible when wearing garments. Issues that can arise from this are chaffing on the back from excessive movement and straps that are too loose.

HOW TO FIX: If less than 1/2″ of decrease is needed, simply shave off the desired amount to the top lines of the pattern pieces. If more than 1/2″ of decrease is necessary, shorten each of the back pattern pieces to desired amount.

Back Too Short

BACK PIECES TOO SHORT: This image demonstrates a back piece that is too short for the body. The top line of the back piece digs close-to or underneath the shoulder blades, creating tissue spillage visible when wearing garments. Issues that can arise from this are chaffing/blistering/bruising on the back from excessive movement and uncomfortable straps.

HOW TO FIX: If less than 1/2″ of increase is needed, simply add the desired amount to the top lines of the pattern pieces. If more than 1/2″ of increase is necessary, lengthen each of the back pattern pieces to desired amount.

Backs Compare

WAISTLINE TOO SMALL: Image A demonstrates what the back looks like when the waistline of the garment is too small for the body. The lacings look away from eachother and are in the shape of an upright triangle. This is typical with weight gain and/or a wrong angle of the pattern pieces for the body shape. **Other Fit Possibilities: If using the Augusta Stays Pattern, this can result from using the “Curvy Silhouette” on a “Straight” body type. **

HOW TO FIX IT: Increase the waistline measurement between all pieces except the front panel to needed amount OR grade to the waist measurement of the next size up in your pattern. If using the “Curvy Silhouette” of the Augusta Stays Pattern, try using the “Straight Silhouette.”

WAISTLINE TOO BIG: Image C demonstrates what the back looks like when the waistline of the garment is too large for the body. The lacings invert toward eachother at the waist and are in the shape of an upside-down triangle. Issues that can result from this are chaffing at the waist from excessive movement and broken boning. **Other Fit Possiblities: If using the Augusta Stays Pattern, this can result from using the “Straight Silhouette” on a “Curvy” body type. **

HOW TO FIX IT: Decrease the waistline measurement between all pieces except the front panel to needed amount OR grade to the waist measurement of the next size in your pattern. If using the “Straight Silhouette” of the Augusta Stays Pattern, try using the “Curvy Silhouette.” 

EASY FIT FREEBIE:

STRAPS FALL OFF SHOULDERS: Shorten straps OR Move the straps more toward center back, creating a slightly more severe angle for those who have more sloped shoulders.

Laughing Stays

We had too much fun at CoCo 2019. Photo Taken be Leimomi Oakes of ScroopPatterns.com

If you’ve made it this far, BRAVO TO YOU. You’ve read over 2700 words of text and I’m already tired writing it… If all this is too much for you to deal with right now and would like hands-on fitting help from yours truly, I’ll be available for a class in June 13th & 14th 2020 with Twins N Needles to help you fit your mockup and prepare you to make your very own pair of Augusta Stays 🙂 Do check out the link if you’re interested!

Happy Fitting and Happy Making, everyone!


Regarding 1780s Stays

Tags

, , , , ,

We’ve had a lot of questions about the 1780s Augusta Stays, and what makes the 1780s different from the surrounding decades.  Here’s a quick post to address a few of them!

Hallmarks of 1780s Stays

A Softer Silhouette: The late 1770s through 1780s really is the beginning of experimental foundation garments that nod toward the loosening silhouettes the early “Regency” or “Federal” era. From what we can gather via images from the time and extant examples is that from around 1775-1789 the straight and primarily fully boned silhouette of the earlier stays styles become more buxom and relaxed. Many examples of “half” or “partially” boned stays from this time period allow the body’s natural shape and contours to influence the stays into a more rounded and slightly more natural silhouette. Whalebone is still the primary source for the boning and the stays are made in a variety of different materials: linens, wools, cottons, blends, and even paper is utilized in some cases.*

1786 Cabinet Des Modes

Here is a great depiction of the “prow front” curvature of the idealized silhouettes from this period. Having the right type of stays make this possible- OR using extra padding to make up for it in your earlier stays;)         Detail from Cabinet des Modes ou les Modes Nouvelles, 15 mai 1786, Pl. I, A.B. Duhamel, after Pugin, 1786, RijksMuseum


Partial Center Front Lacing: This rounded bosom and “natural” curvature is due in part to the use of partial lacing at the center front of the garment. In some extant examples, the lacing at the front doesn’t allow for much adjustment in size, while in others it provides an option to have more of the “prow” shape at the front… or if you want to give your decolletage a little more “oomph” it can help with that.

V&A

There’s a wee bit of wiggle room in there for giving that softer front. Stays, Great Britain, 1780-1789, Linen, Victoria and Albert Museum, T.172-1914


Fewer Boning Channels: The popularity of the partial boning pattern (often referred to as “Half Boned”) also makes the “natural” silhouette easier to accomplish. Whalebone, being the same protein of hair, horn and fingernails, bends and moulds when in contact with heat- so… Fewer boning channels + Somewhat Bendy Pliable Whalebone = A more “Natural” figure. Some examples even have cording- which gives a little bit of support but not nearly as much as a channel of boning might. Because less face it: Having less of an armored vest and more of a light bustier help emphasize that soft and gentle curve of the body so sought after.

M969X.26-P2

I love this piece- cording, boning, delicate lines. So gorgeous.      Stays, France, 1785-1790, Musee McCord, M969X26

Extreme Angles in Pattern Pieces: If you’re looking carefully, you’ll notice that the front piece of most extant stays from this decade have an extreme angle to attach to the side seams. Having the extreme angle allows for the boning pattern to fan out and makes the bust even more thrusted forward- which can be emphasized as-is or with the aid of padding.

NF.1914-0210

This piece is so awesome to show that crazy angle of the front pieces. Without that angle,                             it’s very hard to achieve the silhouette without additional padding at the front.                         Stays, Last quarter of 18th century, Norske Folkemuseum, NF.1914-0210


There’s also an interesting flair in many examples of the side back pieces. One example from PoF5 has a gore, but many of them feature a more extreme flair to the bottom as one piece. What’s great about this feature is that the kidneys and lower back are not crushed by a harsh waistline if you happen to lace too tightly. I’ve found this small detail to make a HUGE difference in how comfortable the 1780s stays shapes are.

V&A red

The blue lines show what piece and curvature I’m talking about. Rather than that piece having straight lines, the flair enables comfortable wear and an emphasized back curvature as well                                               (helpful for the badonkadonk)                                  Stays, 1780s (made) Red Wool, England, Victoria and Albert Museum, T.192.1929

Straps: Most of the examples from this brief time period have straps of some kind, be it a constructed strap or an adjustable tape. Having the straps on a pair of these stays help bring the sides of the bust up and out, pushing the bust tissue forward, and almost acting the same as a demi-cup or push-up bra. Images and extant stays from the 1750s- early 1770s tend to emphasize a wide and flat front bustline, acting more as a means to lift and separate the bust upward rather than push it outward. The straps are also pretty important for keeping the waistline slightly higher- since the straps are holding up the garment, rather than gravity forcing the stays down to settle at the squishiest part of the body… the waist.

Z

This is a fun example of straps that aren’t necessarily the traditionally constructed straps that                       many of the other images show. The straps make a HUGE difference though.             Corset (Stays) 1780-1790, Scotland, National Gallery of Victoria, Melbourne, CT38-1984


A Slightly Higher Waistline and Deeper Tabs: Another interesting note about stays from this 15 year time period is the location of the waistline: Prior to the 1770s (we’re talking 1700-1760s), the waistlines of stays resided either directly at the waist or -if you’re fancy- just below the natural waist. Many of the examples of late 1770s-1780s stays are slightly shorter in length and are meant to for the waistline to be right at OR ABOVE the waistline the closer to the 1780s and 90s you go.

ZZ

Here’s a great example of a mid-late 1780s pair of stays as the waistline of popular silhouettes begin to creep up. The tabs are still pretty long though, when they start to be                teeny tiny tabs, you know you’ve gotten into the 1790s!       Tan Cotton Stays, 1780s, Lot 77, Augusta Auctions

Deeply cut and long tabs also enable a smooth waistline- though the tabs innermost cut should sit around 1/2″-1″ below the waistline to ensure your stays won’t cut off circulation at the smallest part.


Interesting myths surrounding these styles:

pretty lady

She’s thinking, “Why on earth would moderns think that!?”                            Sketched Image, Source Unknown though attributed to The British Museum, I could not find any information!

Breastfeeding: There has been speculation from many, many people that the partial lacing is used for breast feeding or to have the option of lacing without aid from another person. I am not at all convinced of either of these speculations.

Lady and Children

Up and Over, my friends.                                                                        “A Lady and Children” Mezzotint, 1780, Attributed to Pine, The British Museum, 2010,7081.3005

From my own experience, breast feeding up and over the top edge of the stays is not unattainable (actually quite easy for me) and didn’t require partially undressing. There are also many depictions of mothers breastfeeding their children in this manner. According to other clothing historians, stay makers, and scholars I have spoken with on this subject it’s very hard to definitively say that this style is exclusively for breastfeeding as there is not an excessive amount of milk protein residue left in the stays in the original garments that would lead to that conclusion.


Ease of Lacing: The other “myth” I have encountered is that this partial lacing allows for one to lace themselves into the stays by themselves because the front is open.

NF.1914-0210x2

There is NO WAY that circumference (blue line) when laced closed at the back would fit over                                                                  your head and shoulders. No sir.                                                                     Stays, Last quarter of 18th century, Norske Folkemuseum, NF.1914-0210

This cannot be true. With partial front lacing, note where the front lacing ends- right at the waist and smallest measure of the garment- it is impossible to have the center back laced all the way closed and to pull the garment over your head to be able to lace “by yourself.”  Since a few examples don’t have much option for adjustability to begin with I find it hard to conclude that it was used for ease of dressing by oneself .There are a few methods to lacing yourself into a back-laced pair of stays but more on that later…

edited stays hands up

Ahhhh so comfy. This is my pair of 1780s Augusta Stays made from our pattern based off of all this (and more) research.                                                                                                                                 Photo by Leimomi Oakes of The Dreamstress blog             Pattern by Scroop Patterns and Virgil’s Fine Goods available here!

All in all, I really love the shape I have in the pairs of 1780s stays I have made. I’m a huge fan of partial boning because it’s lighter to wear, faster to make, and extremely comfortable. I also just love wearing 1780s fashions because of the extra froof and femininity mixed with the restrained characteristics of the period.


ScroopPatterns.com

   Here we all are in our new 1780s Augusta stays at Costume College 2019! We had so much playing fruit and chocolate sellers. Also, how                                      can you not love the 1780s?!!?!                                         Photo by Leimomi Oakes of The Dreamstress blog

If you want to check out more information regarding this topic, check out my links below!


*In the Patterns of Fashion 5 book, there is information on a lovely pair of stays that used paper as a reinforcement between silk layers.

Additional Information:

Extant 1770s-1780s Stays:

Winterthur 1952.0275, c. 1750-1780
NT 1349940, fustain, c. 1750-1800
A set of stays from the Marjorie Russell Clothing and Textile Museum attributed to the Billinghurst family, linen, c. 1760-1780
MoMu T12/123/O11, silk damask, Netherlands, 1770-1790
Augusta 8.4833.85.177, tan cotton lined with homespun linen, England, c. 1775-1785
BATMC I.27.866, linen and cotton, c. 1775-1799 (Site unsearchable, but pictures available here)
V&A T.909-1913, stays covered in silk damask, lined with linen, reinforced with whalebone, England, 1770-1790
Colonial Williamsburg 1986-45, beige cotton stays, England, c. 1780
Front view and back view, pink jean linen with blue silk, England, c. 1780-1790
Museum of London 49.91/1, brown cotton twill corset with front-tied shoulder straps and center-back lacing, c. 1780-1795
1998-162-50, linen plain weave partially boned stays, United States Provenance, late 18th century
Brown stays, late 18th century, Italian provenance
M969X.26, apricot color partially boned and corded stays, c. 1780-1790
NF.1914-0210, tan partially boned stays, late 18th century
GOS-Nr. AK001867, blue damask front and back lacing stays, c. 1785-1800
OK-13436, yellow back lacing stays, no tabs, c. 1740-1780
T.192-1929, red wool stays, England, c 1780s
T.910-1913, tan silk diaper stays made for doll or sample, England, c. 1770-1780
T.911-1913, buff linen stays without straps, front lacing, England, c. 1780

Period Images of 1770s-1780s Stays:

D,2.3757, Strange Stay Maker trade card, c. 1780-1790s
1874,0711.838, “L’Essai Du Corset”  Antoine Francois Dunnel, 1788
1868,0808.4540, “Frontispiece to Anstey’s election ball, 1776
1935,0522.1.108, “The Last Shift” Carington Bowles, 1790-1793
2010,7081.3029, “A Morning Frolic or The Transmutation of the Sexes”, John Collet, 1780
B1977.14.6315, “The Rustic Lover” Francis Wheatley, 1786
RP-P-2009-1157, “Tailleur costumier essayant un cor de la mode” Pierre Thomas la Clerc, 1778
S.1226-2009, “An Actress at her Toilet, or Miss Brazen just Breecht” by Thomas Collet, 1779
1871,1209.602, “Strawberries Scarlet Strawberries” by Francis Wheatley, 1795

Books that include Stays of this style:

Patterns of Fashion 5 – The School of Historical Dress
Costume in Detail 1730-1930 – Nancy Bradfield
Corsets: Historical Patterns & Techniques – Jill Salen
Corsets and Crinolines – Norah Waugh
Underwear: Fashion in Detail – Eleri Lynn

Sewing Patterns available:

Redthreaded
Scroop Patterns

What to expect with the Augusta Stays Pattern

Tags

, ,

IT HAS LAUNCHED! This new and collaborative work is now available for download at scrooppatterns.com

Check out the video to learn all about what it’s all about or read a bit about it over on Leimomi’s blog, TheDreamstress.com!

Hellooooooooo Youtube!

Tags

I’m very excited to announce that I’ve ventured into the crazy world of YOUTUBE! I know my posting hasn’t ever been on the regular, but part of that was bound up in my frustration with the fact that pictures and text only show a smallll part of the learning process; whereas I feel videos help immensely.

So, after about 5 years of procrastination, I am very glad to say that I’m finally in a great place mentally, physically and time-commitment wise to be able to bring a different level of content to the world of making!

So, what will this new “Lady of the Wilderness” channel be about? You might ask. The purpose of the channel originally was to create an avenue for easier to follow tutorials for those who are visual, rather than textual, learners. BUT now that I’ve gotten a plan, the goals are as follows:

1) Provide helpful tutorials for making; sewing, millinery, fitting, patterning, mixed media, etc.

2) Provide helpful tips and resources for keeping a person healthy (mentally, physically, productively) while doing a making-centric hobby or business.

3) Do interviews with other makers!

4) Real talk. Because there are lots of topics out there within the costuming, cosplay and historical costuming communities that just need to be talked about!

I sincerely hope you all will visit my youtube channel and like, subscribe, share, etc. We have some really super exciting things coming up and I’d love for you to come along for the ride 🙂

Happy Making!

A 1770’s Silk Mantelet

Or maybe a mantle? Honestly I’m not sure what makes them different from what I’ve seen ¯\_(ツ)_/¯ So, this was the first challenge of the year and was made in preparation for a “cold” outing in Colonial Williamsburg- the day after our scheduled Historic Costumer’s Winter Mini-Market in February. As a stash busting project that I was glad to bust-it-out quickly.

Did I drop something? Idk- I never know how to pose with my face…

The Challenge: January: Dressed to the 9’s

Material: Palest lavender lilac silk taffeta scrap (about 1 yardx60″w) from The Purple Edwardian dress a year ago and nearly a yard of white silk taffeta. Silk purchased from Silk Baron.

Pattern: Modified from the Lace Cloak (or Mantle) in Costume Closeup, by Linda Baumgarten, page 50.

Year: 1778-1779

Notions: Silk Thread, Silk ribbon, Pinking Chisel, ribbons

How historically accurate is it? I would say 95%. The garment is entirely hand stitched and trimmed in a manner close to fashion plates from 1778/1779 and”in style.” I decided not to line the Mantelet because Virginia is warm- so is silk- and also, I didn’t want to use any more precious silk from my stash.

Hours to complete: 10. The body of the garment itself took about 4 hours to complete, whereas the trimming took at least 6 hours. Always allot double time for trimming. ALWAYS.


First worn: Colonial Williamsburg for a promenade down DoG street- More pics can be viewed through others’ instagram accounts. I was abysmal at taking photos that day- sorry, everyone.

Total cost: $30ish for a large scrap of lavender silk and the one yard of fabric for the trim

What would I do differently? This was a hasty project (I absolutely *thought* I needed something for Virginia- spoiler alert– I did not need it, but wore it anyway GOSH DARNIT) so… I didn’t completely think through the functionality of the hood and made it too shallow to be useful. It is a purely decorative hood- and that fact makes me sad.

Takeaway: This was a really fun project to try and also to make-do with the stash remnants. For wear, I was surprised at how warm it was with no lining. It did try to choke me a lot, but I’m not sure how to keep a cloak- like garment from doing that, aside from the cross cross tie technique. I did feel extra spiffy in this Mantelet, even though it completely covered the great fit of my new wool dress. I definitely felt “Dressed To The 9’s” with my extra silk!

I also finally got to debut the Giant Calash bonnet from 6? years ago! Super fun and weird way to spend the day.